Billing run preparation
Table of contents
Before the billing run can be started, some standard steps should be performed before any invoices are closed or approved. As mentioned in the section on Invoices, invoices cannot be opened again once Approved or Closed and will stop adhering to any additional changes. Because of this, it is important to know before moving the invoice to a finished status, whether the invoices are correct and complete. Therefore, this sub-sections below will go into more detail on how to check the correctness and completeness of the data that goes through CloudBilling.
API check
When the API is used, it is wise to check whether the usage came in as expected. Information sent in through the API will also have a purchase reference which can be searched for in CloudBilling. Additionally, the import time could be checked to see whether all information came in as expected. To perform this check, follow the follow steps:
- Identify purchase references or the time that the API ran to be able to check the times.
- Go to the Purchases page in CloudBilling.
- Click on the [Advanced] button.
- Search for the identifier that was chosen by searching for the purchase reference or selecting the corresponding dates.
- Check whether the purchases look as expected.
If there are purchases with a little blue arrow in the environment, that means they are being routed to another customer. In the case that this is not the desired outcome, investigate the Purchase Routing settings.
Use of Excel Editor
The Excel Editor, when active in the environment, can be used to import or update purchases and customers in CloudBilling. It is possible to create records from the Excel Editor, but it is highly recommended to prepare the data in Microsoft Excel or a similar type of program. Then the Excel Editor in CloudBilling will only be used to bring the data into CloudBilling. The Excel Editor is most often used to import purchases in bulk that do not come into CloudBilling automatically (through an API connection or a connector).
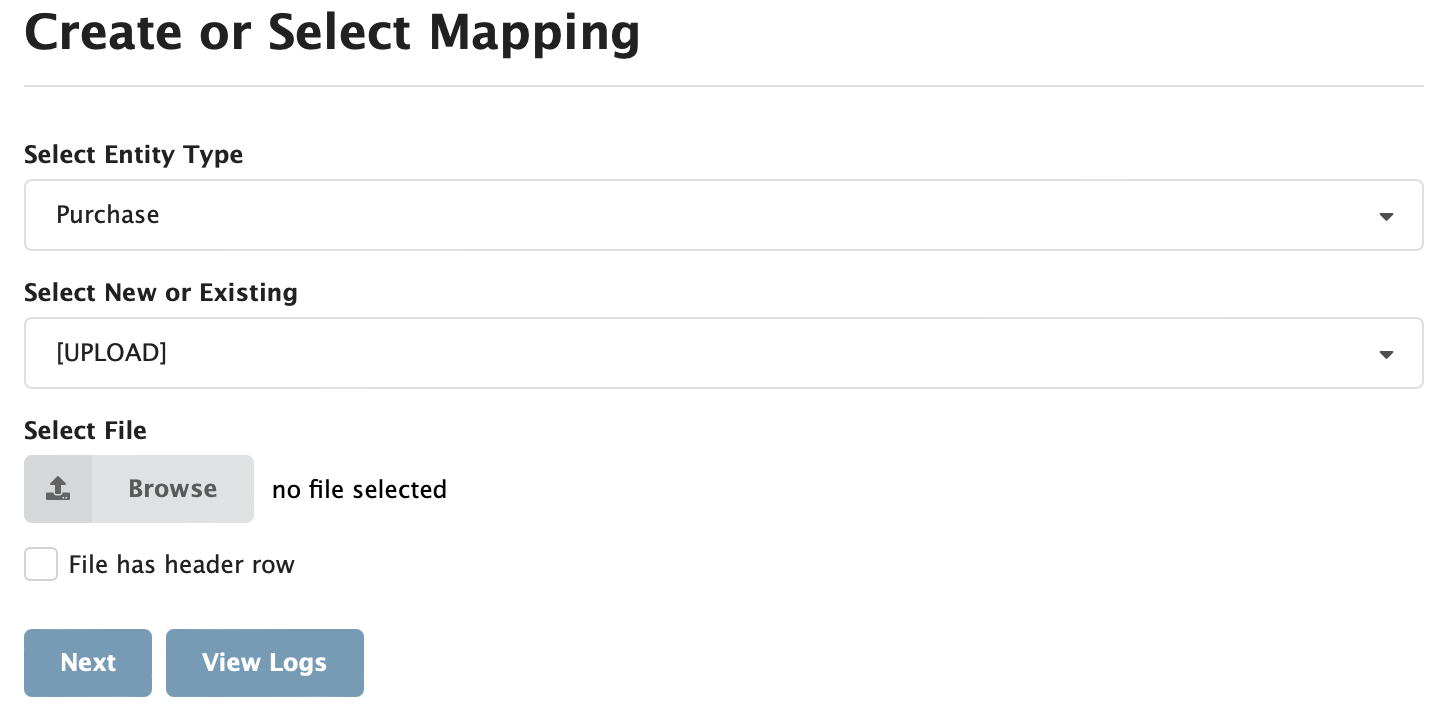
To import a file with the Excel Editor, either select the Excel Editor text in the menu bar, or hover over the Connectors text in the menu bar and open the Excel Editor from there. This will bring the user to the Create or Select Mapping screen as shown in 1. The steps below the Figure can be followed to successfully upload a file with the Excel Editor.
Figure Billing Run Preparation 1: Create or Select Mapping screen
- In the Select Entity Type drop-down, select Purchase or Customer.
- The procedure for importing Purchases and Customers is the same.
- It is recommended to use a template to import Customers or Purchases. These templates are prepared with the correct header labels for easier processing. Download these from https://docs.cloudbilling.nl/docs/connectors/excel-editor.html
- In the Select New, Upload, or Existing.
- New creates a file from scratch in the Excel Editor.
- Upload is used to upload a file from the computer.
- Existing is for the selection of previously created files.
- For this step-by-step, select [Upload] and then use the [Browse] button to upload the (prepared) file.
- Check the File has header row box if the selected file has a header row.
- Use a header row with pre-defined column titles for easier uploads. CloudBilling can then automatically map the correct columns to the corresponding CloudBilling objects.
- Click the [Next] button. After a few seconds, the file you selected will be displayed in CloudBilling.
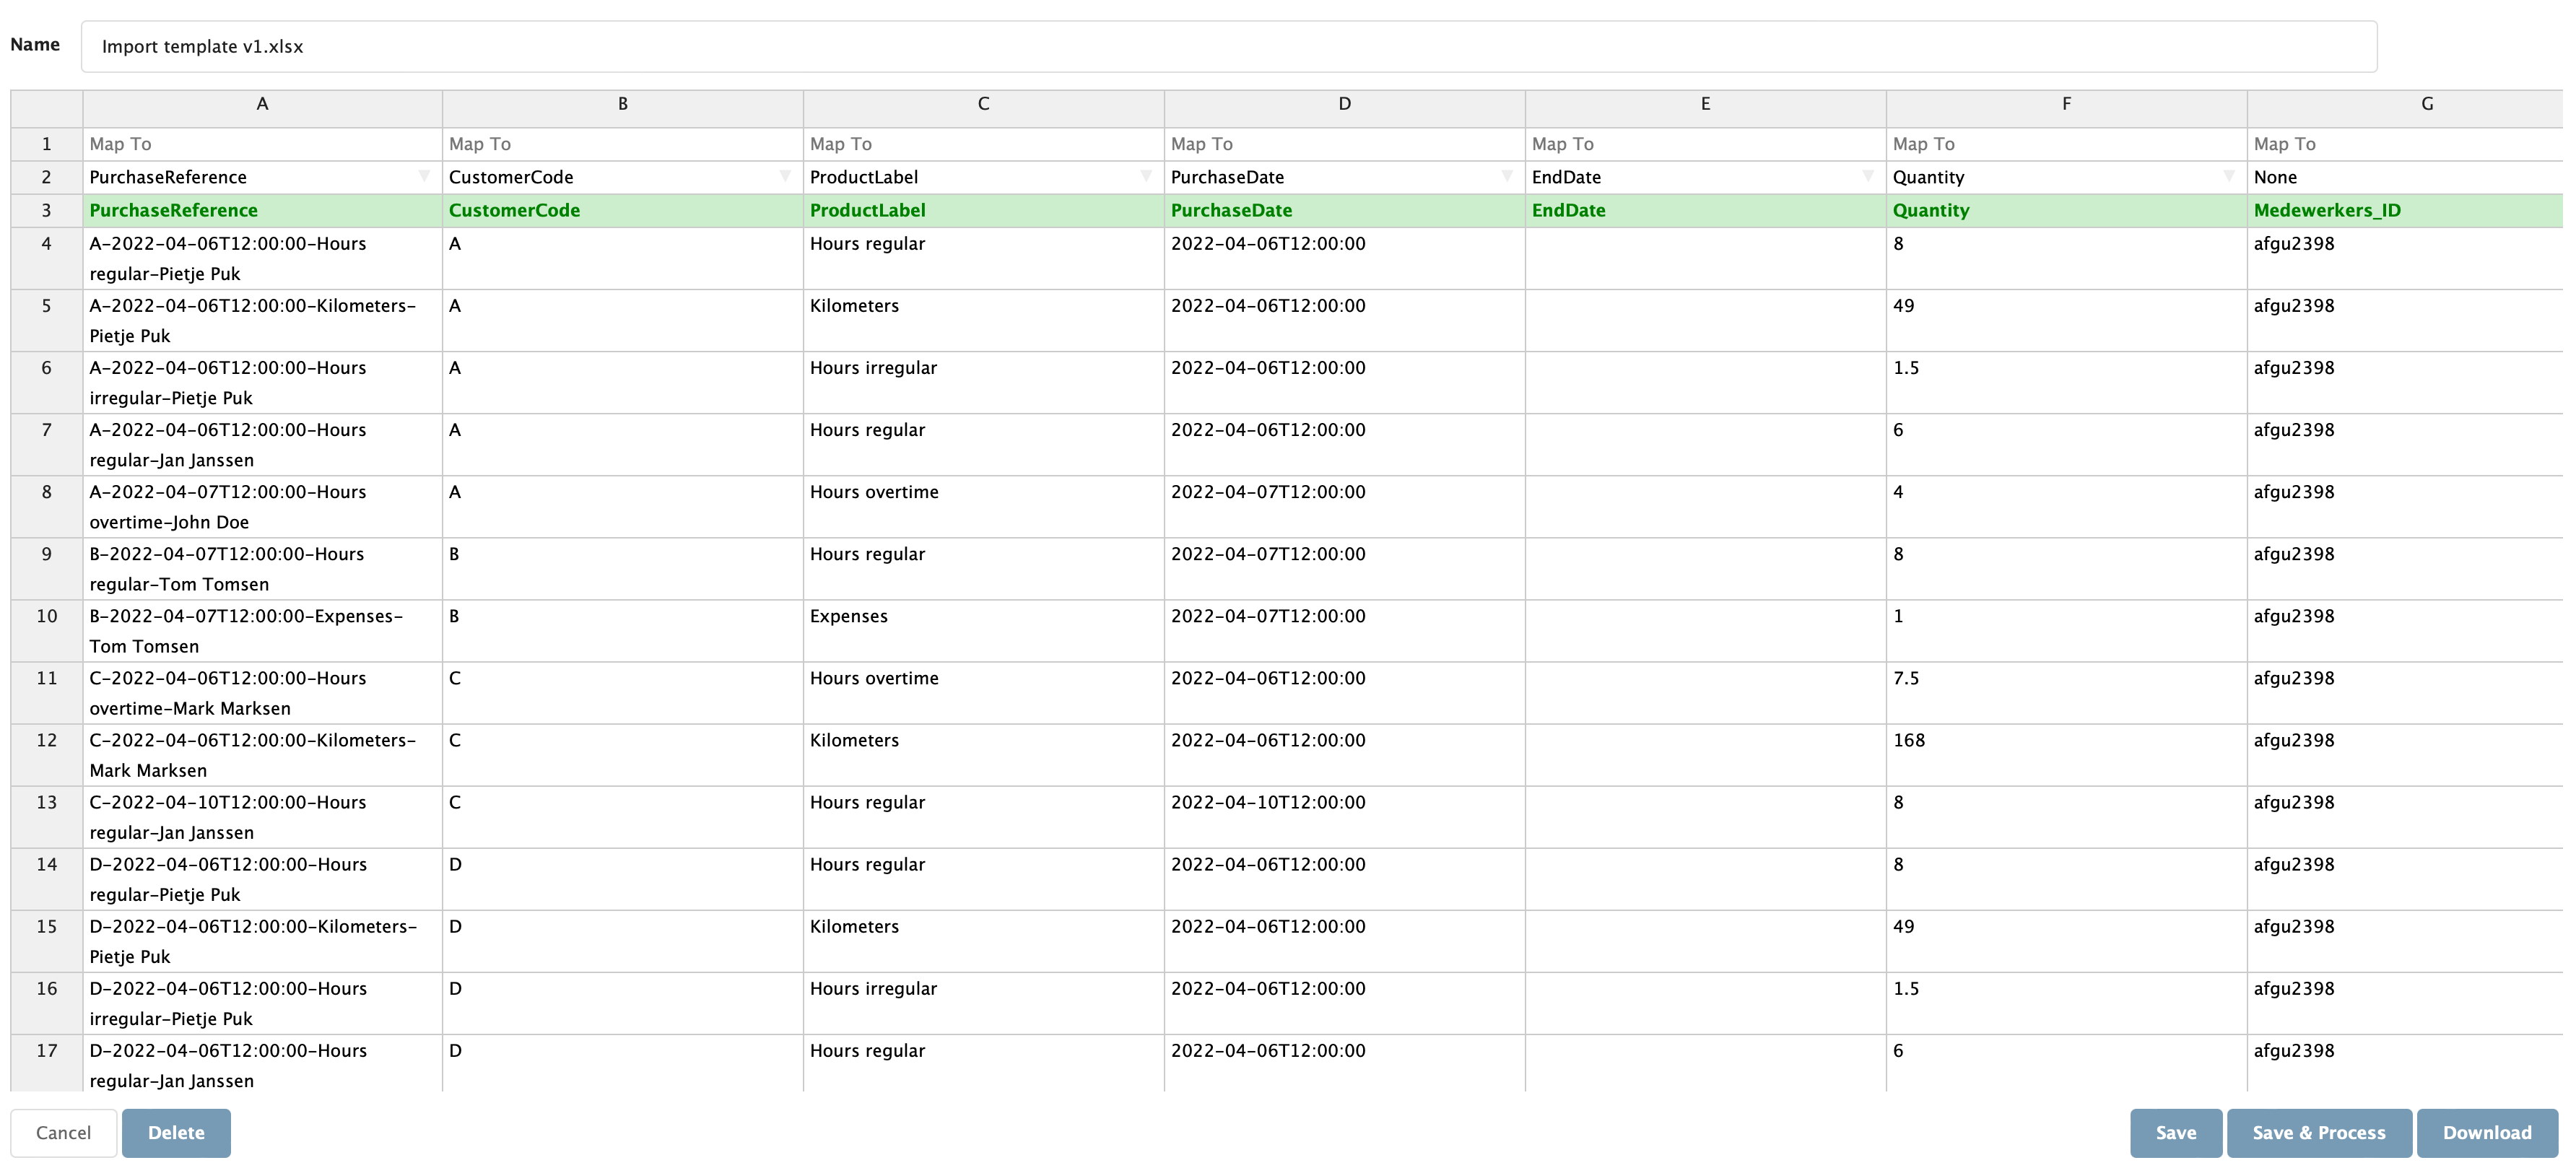
- When one of the templates is used, it should look like the Figure Billing Run Preparation 2. The green header represents the header of the original file, while the row above that represents the object that CloudBilling is trying to map the column to.
- Check beforehand whether the columns are correctly mapped.
- Check whether all date fields have this format: yyyy-MM-ddThh:mm:ss (2019-01-01-T12:00:00) and all numeric values use dots (.).
- For metadata, the key is the header and should be mapped to the correct type.
Figure Billing Run Preparation 2: Example Excel Editor mapping
On the CloudBilling documentation linked above, an example mapping of the columns can be found. After all columns are mapped and labeled correctly, click Save & Process. CloudBilling will import the data from the Excel file. A field with the text “Successfully saved file changes” will appear. Navigate back to the start screen of the Excel Editor by clicking cancel and click the [View Logs] button to check whether all records are imported correctly. The logs show a row that gives details regarding the latest import, check over here whether the purchases or customers came through properly.
- In case of a purchases import, the log will state “Imported 0 customers and <a number> purchases from file <filename>.
- In case of a customer import, it will show the other way around.
It could take a while when all purchases will appear under the “Purchases” section, as purchases are always put in a queue and are processed in a sequential manner. Once the purchases or customers have been processed by CloudBilling they can be viewed by the user. Additional checks could include cross-checking purchase references from the Excel file with the purchases page as described in the section above.
Connector checks
As mentioned before in the Connectors section, the customer mappings in the connector and the connector health can be checked by clicking the Connectors header in the menu bar. In the overview of the active connectors in the environment to the left side of the page, each connector has a link to the customer mapping page, activity page, and the settings page. All these pages can be utilized to perform connector health checks.
First, the customer mapping page can be used to see if all tenants that came in through the connector have been mapped to their respective CloudBilling customers. This is ideally done directly after a new customer came in. However, it can happen that a customer was previously unmapped and is only discovered at the end of the month. It is then wise to follow these steps:
Step-by-step: How to map an unmapped customer
- Map the customer to their respective CloudBilling customer, if appropriate.
- If necessary, make a new CloudBilling customer.
- Go to the settings of the connector and set the look-back to 40 days.
- This will automatically change back to the default after one run.
- Check the following day whether usage now came in for this customer.
Additionally, the activity page can be used to review the connector runs of the past month. This is always highly recommended, especially for license runs. When a license run does not properly run, the data cannot be automatically retrieved the next day. This means that the data should then be manually uploaded. There are different statuses in the activity screen for connector runs.
- A green checkmark indicates a successful billing run.
- An orange exclamation sign indicates that an error has occurred.
- A red exclamation sign indicates that the connector run did not correctly complete.
- A spinning circle of any colour indicates that the connector is currently running.
Any errors should be investigated further. To do so, the connector run showing an error can be opened by clicking on the name of the connector. The connector run page will then show a table in which any errors are marked as orange or red coloured rows. Often, errors are resolved when a connector successfully runs during the next run, as for most types of connector-runs the usage can be retrieved with a certain lookback. The only exception is the Microsoft Licenses and NCE Licenses, those do not have the possibility of a lookback. If there is reason to doubt whether the usage came in fully, feel free to contact support.
There are two types of connector-runs, usage runs and maintenance runs. A usage run shows in the top of the table what type of usage it is retrieving and will show in table rows when it moves on to another type of usage. Maintenance runs will always be recognized by the run stating that it is running for maintenance in the top row. It is less important to look for errors in the maintenance runs, as one correct run will always correct the previous runs for maintenance again.
Unmapped Purchases and Customers checks
In Unmapped Purchases, unmapped purchases were already explained in more detail. During the billing run preparation, it is important to map any unmapped purchases that should appear on the invoice. All unmapped purchases should be mapped unless they do not appear in the reconciliation files. For more information on how to map unmapped purchases, there will soon be a separate manual available. Unmapped purchases can be mapped when the reconciliation file is available. In general, the steps of checking unmapped purchases will be as following: Step-by-step: How to map unmapped purchases
- Download the appropriate reconciliation files from the Partner center.
- Go to the Unmapped purchases page.
- Click on an unmapped purchase, this will redirect the user to the related purchases on the purchases page.
- Open one of the purchases by clicking on the [Edit] button.
- Search for any identifying information. (e.g.,)
- METER_TYPE
- OfferId
- OfferName
- Category
- Search for the identifying information in the reconciliation file to confirm whether the purchase is in the reconciliation file.
- If the purchase does not appear, the purchase can either stay unmapped, be removed, or mapped to a dummy product ( an empty product without pricing rules).
- When the purchase appears to have usage, it should be mapped.
- Make a new product, with the Product Label as an SKU.
- Based on the reconciliation file, make appropriate pricing rules for the product.
- Check whether the usage now pulls through to the invoice(s).
Additionally, Customer Codes and Invoice References can be unmapped as well. When the customer is unmapped, the purchases will not be retrieved for this customer. Check whether these were simply sent in incorrectly in a similar way. Once this check has been done these purchases with unmapped Customer Codes or Invoice References can either be removed or mapped accordingly.
For AWS Unmapped purchases the CloudBilling consultant can run a monthly script which will semi-automatically map these purchases. AWS sends in their purchases with override unit prices and costs and can therefore be more easily mapped by the consultant. This can be done for the currently handled consultancy fee.
Custom Pricing and other exceptions
It could be that there are currently custom pricing rules in place for customers. Before the billing run is started, it should be checked whether these custom pricing agreements are properly implemented and function as expected. Preferably, an overview of custom pricing agreements should be kept by the user, to allow for appropriate checks with the reconciliation file.
A custom pricing rule should be put on the right rule order, taking into consideration how the pricing rule order treats the order of product clusters, customer clusters, and the rule order. Custom pricing rules can be made for any type of pricing rule and for custom periods. Refer to the Pricing Rules chapter for more information. If any help is preferred, please contact support.

