Purchases
Table of contents
Purchases in CloudBilling reflect any kind of product or service that customers need to be charged for. Depending on the user their business and industry, this could be a contract fee, subscription, recurring purchase, usage or a product or service, for example.
As explained in the Introduction, purchases will need customers, products and pricing rules set up in the CloudBilling environment to work as expected. The purchase will come into the environment and connect itself to a specific customer and product cluster. Based on these mappings, the purchase will go through the corresponding pricing rules and end up as a line on the invoice. This chapter will further explain how purchases can come in, the function of product labels, unmapped purchases, billing of purchases, pricing overrides and metadata on purchases.
Purchases
Purchases in CloudBilling can come into CloudBilling in multiple ways. Purchases can be uploaded with the Excel Editor, they can come in through an API connection, be pulled through a connector with a partner environment, or manually added. The Purchases page can be found in the menu bar (Figure Purchases 1). When hovering over the Purchases button in the menu bar, the Unmapped Purchases page can also be found. Additionally, the Connectors page and the Excel Editor page can be found in the menu bar as well. If no connectors are connected to the environment, the header will be called “Excel Editor”. When connectors are present in the environment, the Excel Editor can be found as an extra option by hovering over the Connectors text in the menu bar.
Figure Purchases 1: Purchases and connectors menu bar options
In this Chapter, the purchases themselves will be discussed in more detail. More on the connectors and Excel Editor can be found in Chapters Connectors and Excel Editor.
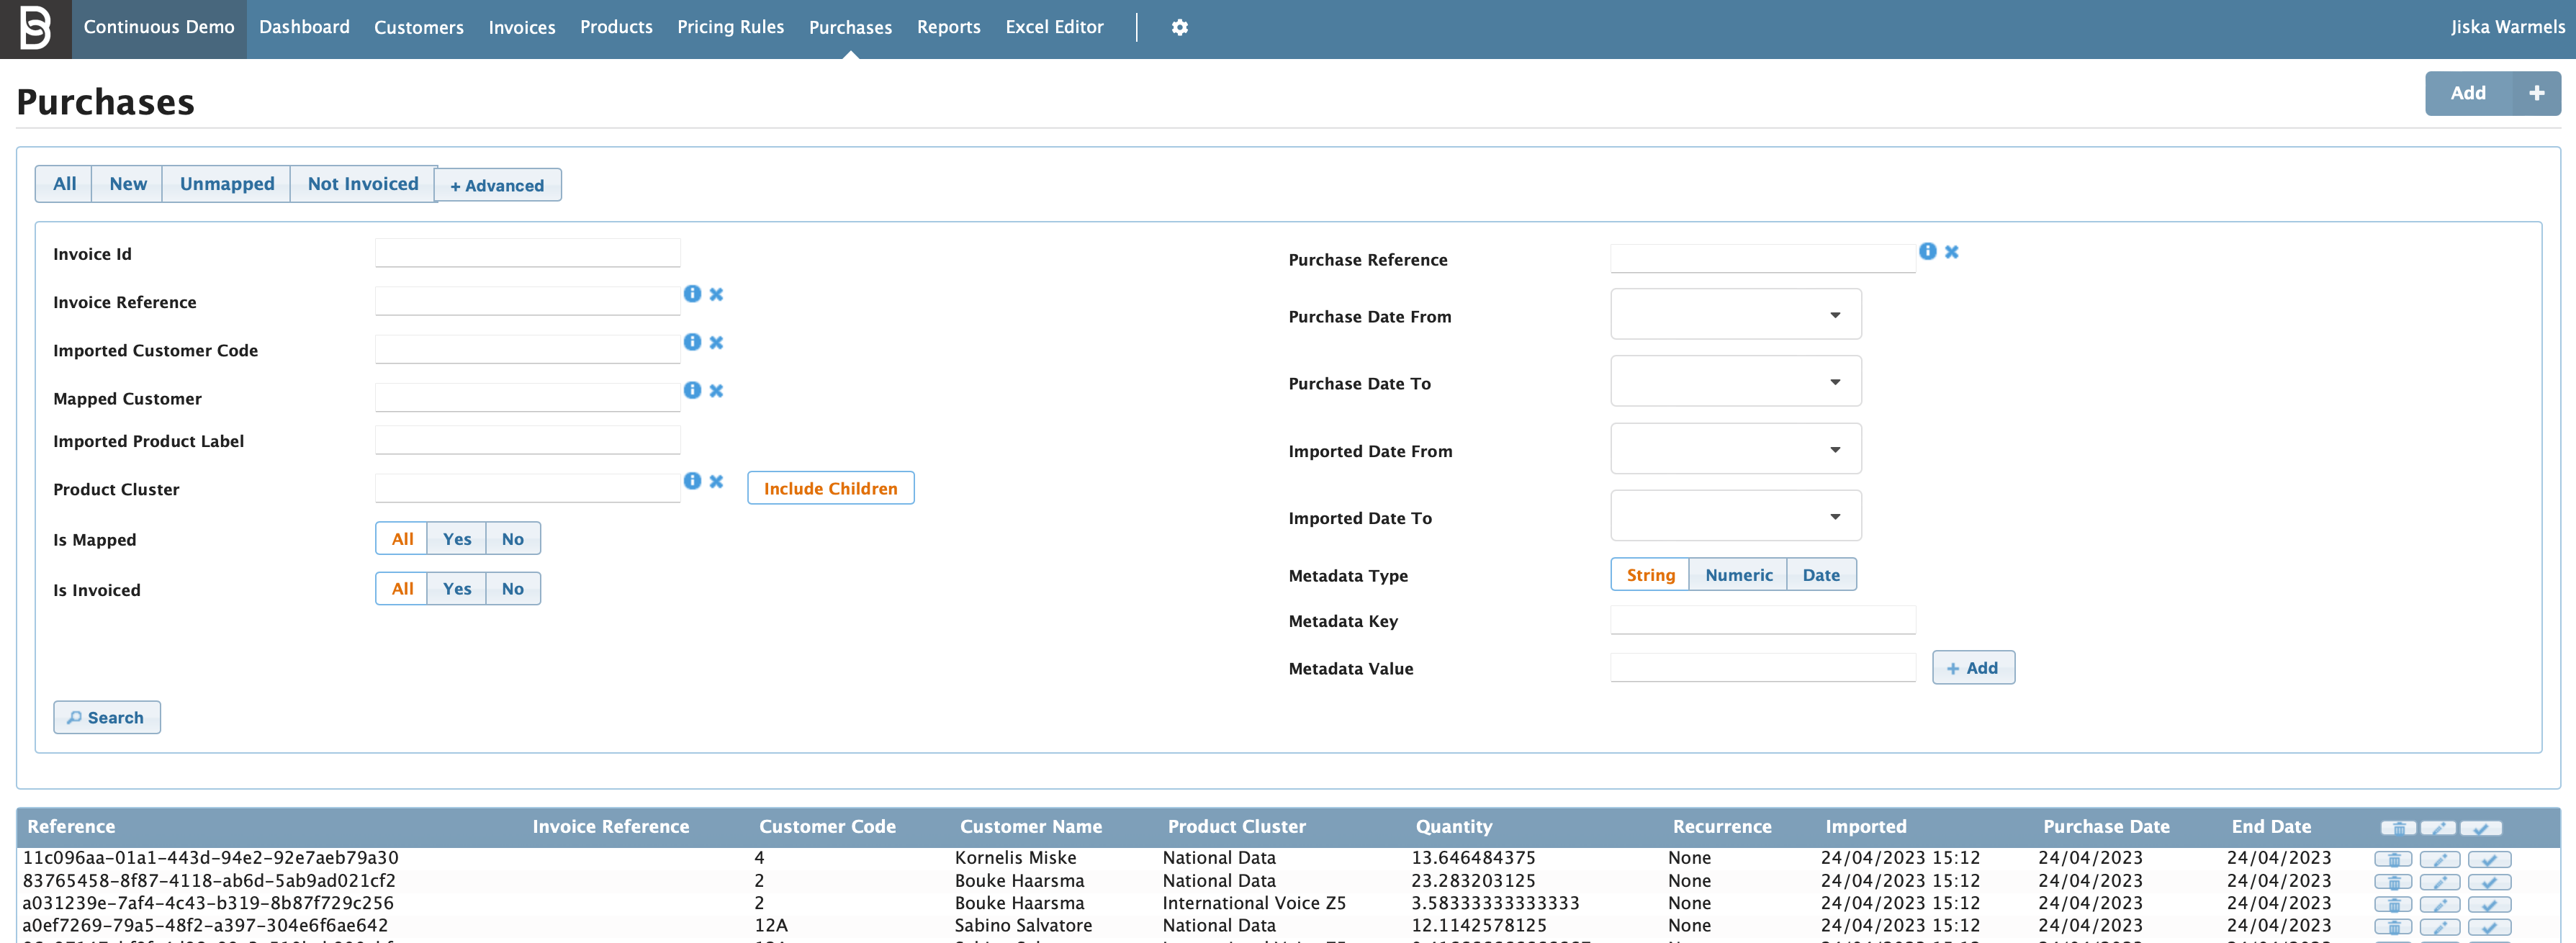
Clicking the Purchases button in the menu bar will redirect the user to the Purchases page. On the left top of the page under the name “Purchases” some filter options are provided. This will allow the user to filter on All, New, Unmapped, and Not Invoiced purchases with one click. Additionally, the Advanced options can be chosen, which opens the options shown in Figure Purchases 2. This will allow the user to also search on more detailed information. The options include invoice ID, invoice reference, imported customer code, mapped customer, imported product label, product cluster, is mapped, is invoiced, purchase reference, purchase date from, purchase date to, imported date from, imported date to, metadata type, metadata key, and metadata value.
Figure Purchases 2: Purchases screen advanced options
These fields all allow searching for information on the purchases. When searching for metadata, all three metadata fields must be filled out and correspond with the metadata field on the purchase. Then the [+ Add] button next to the metadata value field must be clicked before using the [Search] button.
To the right side of the Purchases table, three different buttons are present; a bin, a pencil, and a checkmark. The bin is used to delete purchases, the pencil to edit purchases, and the checkmark to multi-select purchases. It is important to know that purchases can only be deleted if they are not linked to a finished invoice, the status of the invoice must be “Open” for purchases to be deleted. Purchases can only be edited one-by-one. The checkmark in the blue bar of the table will select all purchases, be careful with using this checkmark to delete purchases.
The checkmark in the blue bar of the table will select ALL pages of purchases in the current selection, be mindful when using it to delete purchases.
Purchase set-up
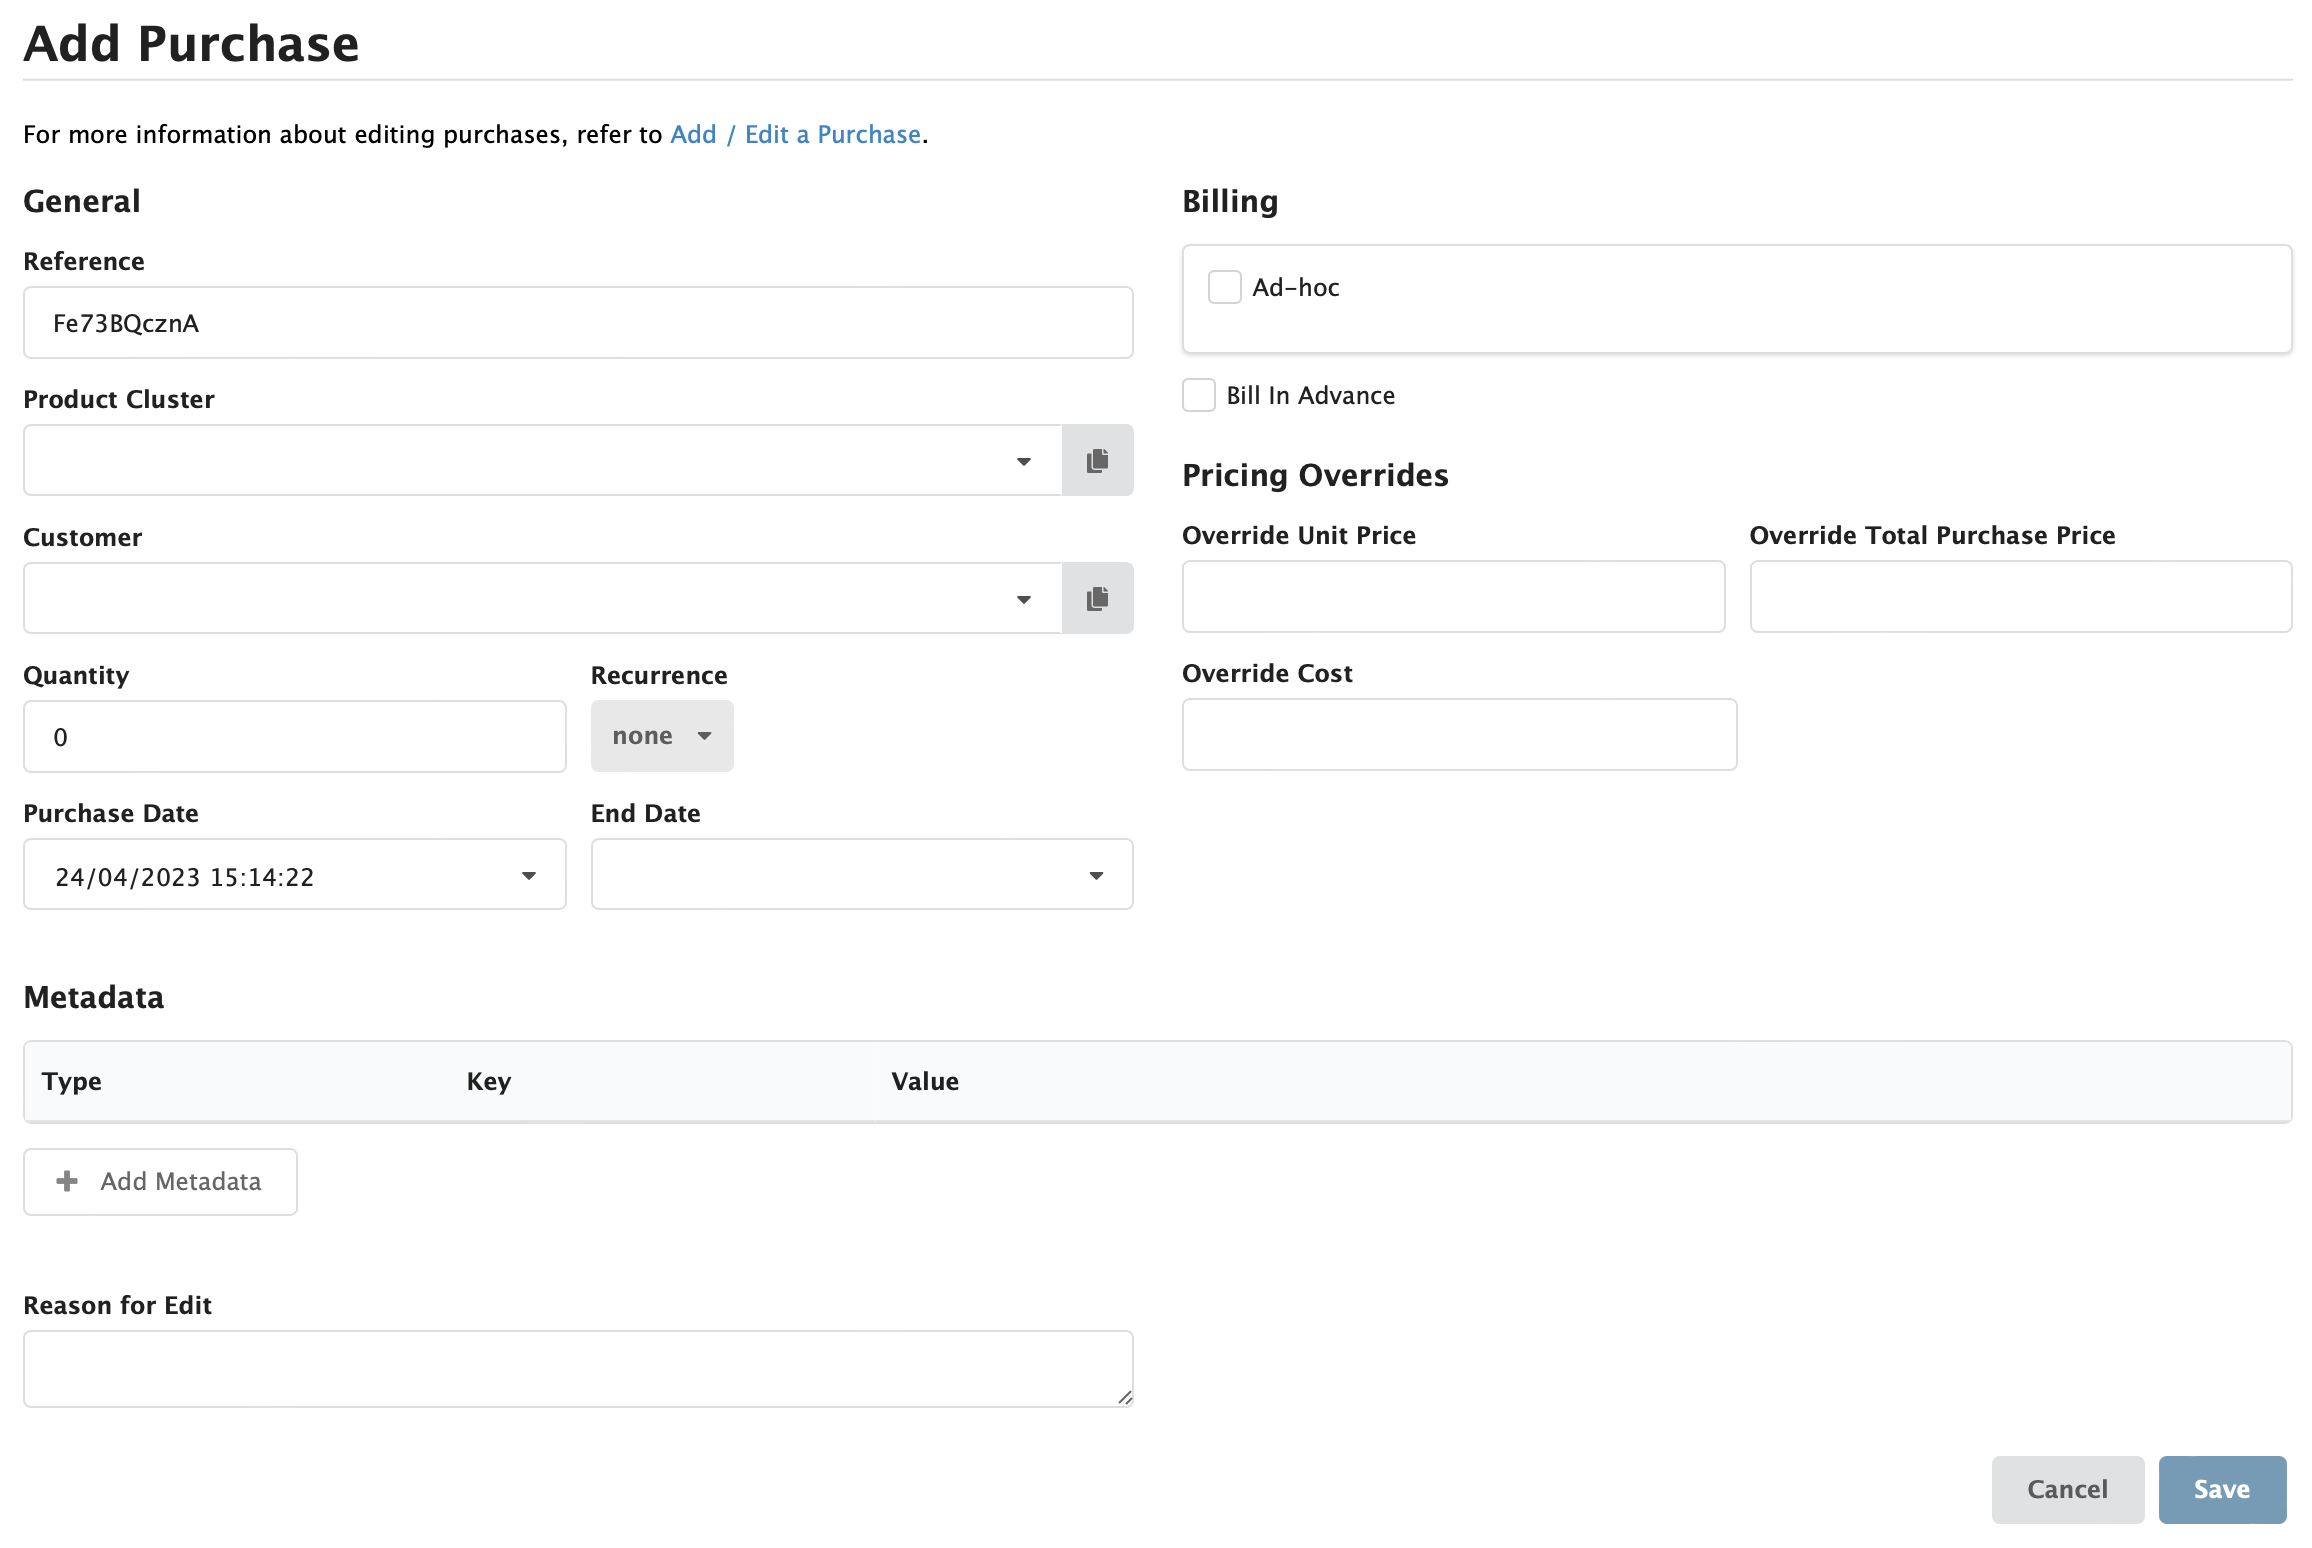
As briefly discussed in the first paragraph, purchases can come in (semi-)automatically, or be added by hand. When adding a purchase by hand, the [Add] button in the right top of the Purchases page can be used (Figure Purchases 2). This will redirect the user to the Add Purchase page, as can be seen in Figure Purchases 3. A new, manual, purchase will always have a Reference generated by CloudBilling and the current date and time in the Purchase Date field. The other options will be blank and can be filled out by hand. The mandatory fields for purchases are the Reference, Product Cluster, Customer, Quantity, and Purchase Date.
Figure Purchases 3: Add Purchase screen
The product cluster will correspond with the product that is bought, while the customer corresponds with the customer buying the product. The quantity will determine how many units of the product are being sold. Additionally, a purchase can be set to “recurring”, with the Recurrence option. This will ensure that only one purchase must be made for, for example, a yearly subscription paid monthly. The Recurrence options are None, Second, Minute, Hour, Day, Month, and Year. These settings will consider the Purchase Date and End Date. If a purchase End Date is kept empty for a recurring purchase, it will be billed infinitely.
The Purchase Date and End Date are time fields. They will open a little calendar view when clicked, where a date can be selected. These fields are used to determine on which invoice a purchase should appear. A purchase with a date set in September, as can be seen in the screenshot, will connect itself to the September invoice if this invoice is not already Approved or Closed. If a purchase only has a Purchase Date, which is the start date, the purchase will be put on the invoice that contains that date in full. For non-recurring purchases, the purchase might be split over two months if the end date is in the next month.
Assigning a Purchase to an Ad Hoc Invoice
When manually adding a purchase in CloudBilling, users can associate it with a specific Ad Hoc invoice. This ensures that the purchase is billed separately from standard periodic invoices.
To link a purchase to an Ad Hoc invoice:
- Navigate to the Purchases page.
- Click the
[Add]button at the top right to create a new purchase. - On the Add Purchase page, fill in the required details such as Product Cluster, Customer, Quantity, and Purchase Date.
- Select Ad-Hoc within the billing section to show the Invoice Reference field, select the Ad Hoc invoice previously created. This ensures that the purchase is linked to the selected invoice instead of the default periodic invoice.
- Review the information and click Save to finalise the purchase.
Once saved, the purchase will be assigned to the selected Ad Hoc invoice, ensuring it shows up correctly in the billing process. If the selected invoice is Approved or Closed, the purchase cannot be added to it, and a different invoice should be selected.
Billing
Under the Billing header, two settings are present; the Ad-Hoc checkbox, and the Bill in Advance checkbox. The Ad Hoc checkbox allows the user to add the Purchase to an existing Ad Hoc invoice. Adding an Ad Hoc Invoice can be done through the Invoices page and will be explained in more detail in Chapter 2.5 Invoices. The Invoice Reference of the existing Ad Hoc Invoice must be put in the Invoice Reference box on the purchase that appears when the Ad-Hoc checkbox is ticked.
The Bill in Advance checkbox the Purchase will attach itself to an invoice that is one period earlier than the Purchase Date. For example, when a purchase has a set purchase date in June, having the checkbox on will put the charge of the purchase in May instead, if the invoice for May is still Open. Otherwise, the purchase will just be charged in June. This option is mostly used for Purchases that should be paid in advance.
Pricing Overrides
The pricing override section can be found below the Billing section and exists in three boxes, respectively for the Override Unit Price, Override Total Purchase Price, and Override cost. These pricing options can be used when the price that is set up in the pricing rule should not be used. They are also used often by the connectors to steam in the pricing of a product automatically. The overrides can be used to use a different price per unit, for the total purchase or for the cost. The unit price will consider the quantity on the purchase to determine the total price, while the total purchase price will not.
Metadata
Metadata can be found at the bottom of the purchase and has three different possible types, Text, Date, or Number ( Figure Purchases 4). Metadata can be added by clicking the [Add Metadata] button. A new line will appear with a Type, Key, Value, and a [Delete] button with the icon of a trashcan. When metadata is added, it must have all values filled out; otherwise the purchase cannot be saved.
Figure Purchases 4: Metadata fields on purchases
The Keys of the metadata are often determined by the user, they can come from or be used by an external system or be used by the pricing rules to group purchases based on metadata. The Key fields are case-sensitive and should not have trailing spaces for them to be effectively used. Text metadata Value fields have a free format of text, numbers, and special characters. A Date metadata Value will also open a calendar view and ensures itself that the format of the date is correct when using this calendar to select the correct date. Number metadata Values only use round and decimal numbers. The decimal place is indicated with a dot (.).
Metadata Keys are case-sensitive and should be the exact same format to be effectively grouped with other metadata fields.
Unmapped purchases
Shown in Figure Purchases 1, the Unmapped purchases can be found when hovering over Purchases in the menu bar or using the dashboard purchase module. Clicking this button will redirect the user to the Unmapped Product Labels page (Figure Purchases 5). In the Unmapped overview to the left of the page, the user can also travel to unmapped Customer Codes and unmapped Invoice References. Ideally, there would be no unmapped labels of any kind in the CloudBilling environment.
Figure Purchases 5: Unmapped Product Labels screen
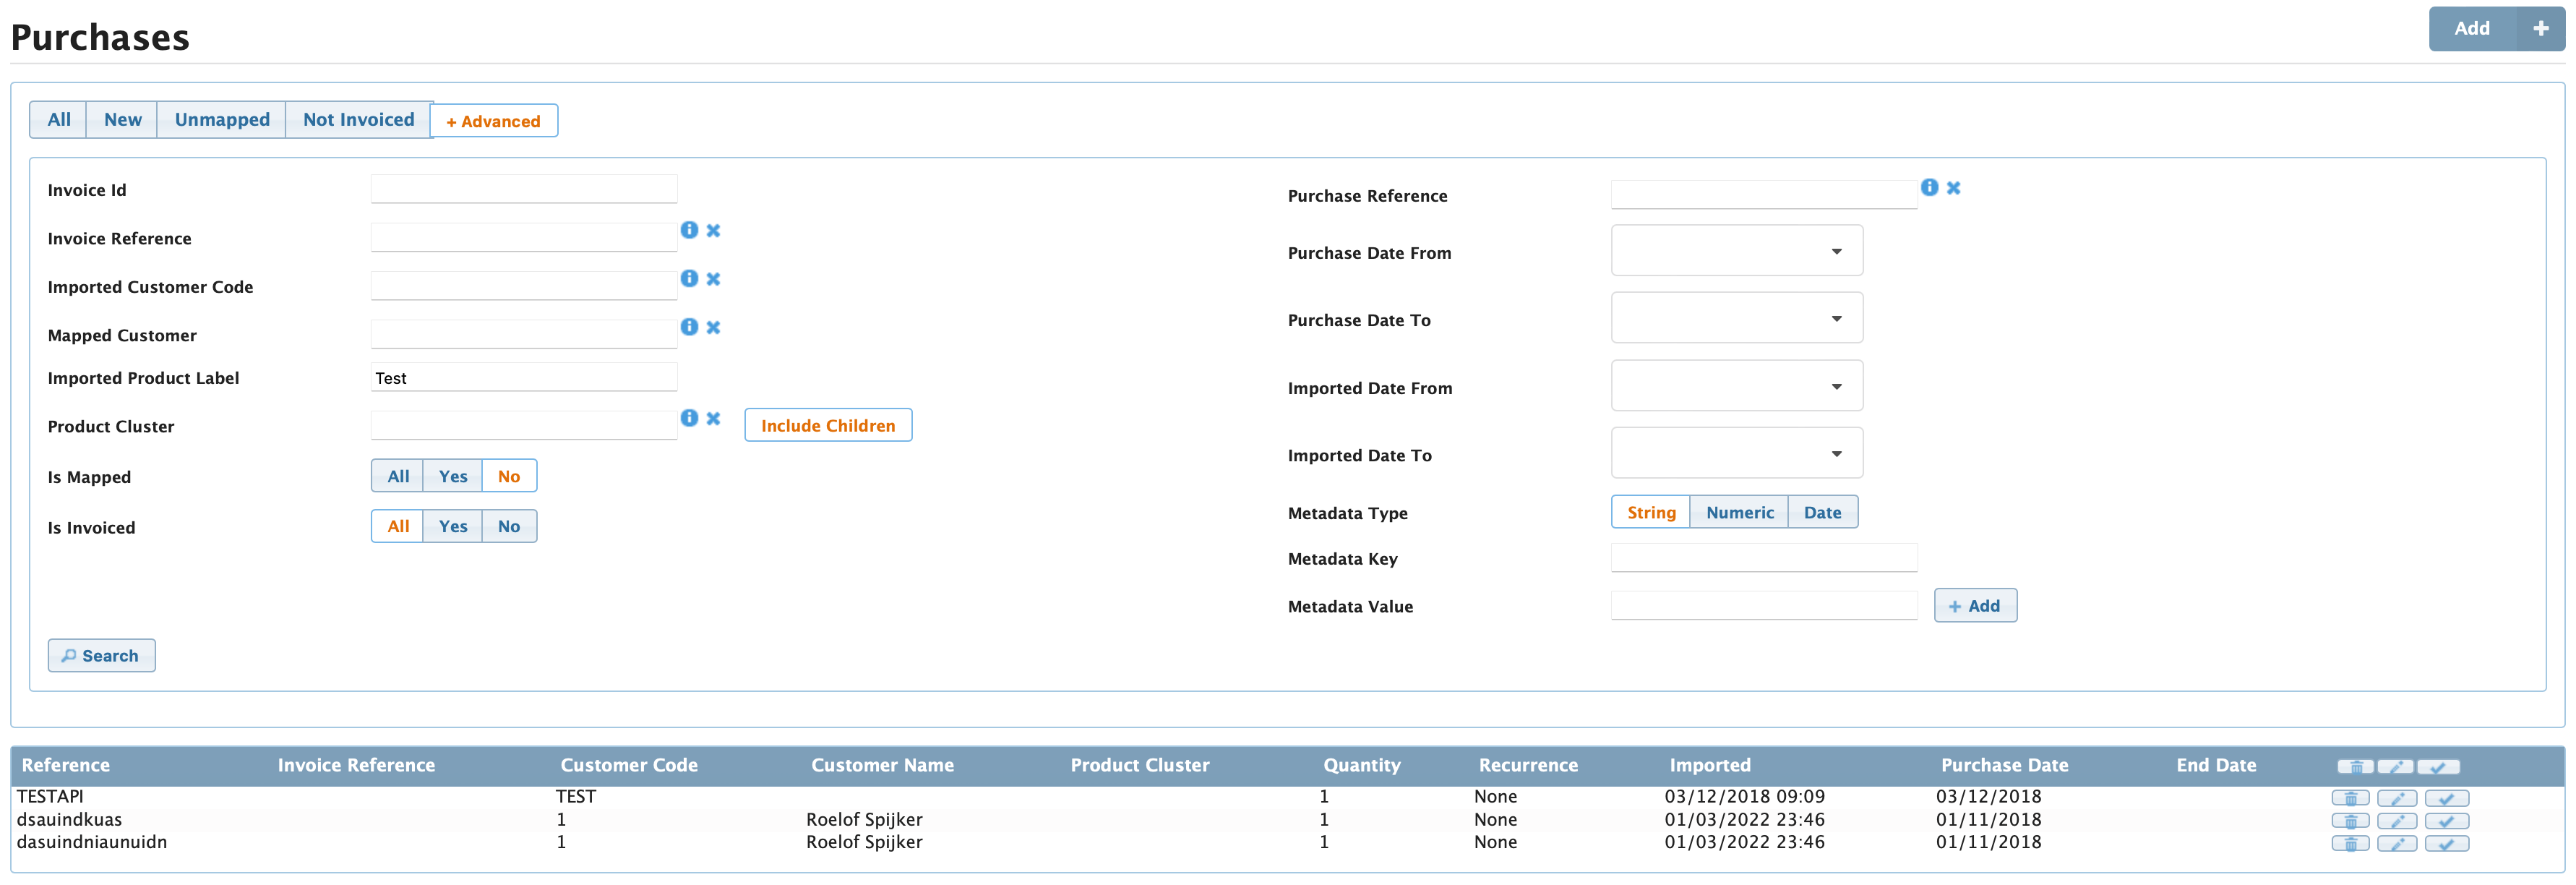
The lines in the tables are clickable, which will redirect the user to the Purchases page with a filter on the Imported Product label (Figure Purchases 6). When the product is unmapped, it means that CloudBilling cannot immediately map the imported product label to a product. Therefore, the Product Cluster of these purchases is empty. It can also be that the Customer Cluster cannot be directly mapped onto an existing customer. Then, the Customer Name will be empty. Usually, the mapping of purchases occurs automatically during the automated import process. This process maps a purchase to a product by matching the product label of the purchase to an SKU of a product, and to a customer by matching the customer code of the purchase to that of a customer. It can also be that the purchase comes in with an invoice reference that does not exist, for example, when it should have been connected to an Ad Hoc invoice.
Figure Purchases 6: Unmapped Products on the Purchases page
For purchases without product clusters, there are two ways to ensure that these purchases are mapped. When the purchase comes in for a product that already exists in the environment, the purchase reference can be retrieved from the purchase and added to the corresponding product as a new SKU. When the product does not exist in the environment yet, a new product and corresponding pricing rules should be made that contain the purchase reference as an SKU. In both cases, new purchases that come in with the same purchase reference will now automatically be mapped.
When it comes to unmapped customers on purchases, often the customer does not exist with the customer code sent with the purchase. Therefore, it will often be the case that the customer will have to be made in the environment so that the purchase can be mapped. If the customer code that came in is incorrect, the purchase can also manually be mapped to the correct customer, by clicking on the “edit purchase” pencil and selecting the correct Customer.
Similarly, to map purchases that came in with an incorrect invoice reference, either a new invoice with that reference can be made or the purchase can be mapped through adding in the correct invoice reference in the purchase.
Deleting Purchases
When incorrect purchases are created, they can be deleted. Deletion is only possible if the purchases do not belong to a Closed or Approved invoice. Purchases can be deleted either one by one or in bulk. In the Purchases page, use the advanced filtering options to filter the purchases that need to be deleted.
Here are some examples of how to identify incorrect purchase:
- The quantity or price of a purchase in the invoice does not match the expected values. Please be careful and double-check the purchase parameters before deletion.
- For Microsoft’s cloud products, the connectors retrieve purchases for the entire month around the fourth or fifth of the next month. Therefore, when checked on or after the sixth, the previous month’s invoice shouldn’t have purchases with import dates before the third. For example, when checked on May 6th, April invoices shouldn’t contain Microsoft purchases with import dates before May 3rd.
In the first case, it is better to delete incorrect purchases one by one. You will need to check the various purchase parameters such as price, quantity, or date, to see which one is incorrect before deleting it. In the second case, it is better to delete several purchases at once. On or after May 6th, you can filter out April purchases with import date before May 3rd and delete them together.
To delete purchases, first click on Purchases in the menu bar to navigate to the Purchases page. Click on +Advanced and use the advanced filtering options to filter out the potentially incorrect purchases. Then follow either of the two steps below depending on the use case:
- Delete incorrect purchases one by one:
- This option is best suited for deleting a limited number of purchases, and when each purchase must be inspected to check for incorrect values before deletion.
-
On the right side of each purchase, click on the pencil icon. This will open the Edit Purchase window. The purchase parameters can be checked here to see which one is incorrect.
Figure Purchases 7: Edit Purchase Icon
- At the bottom of this window, click the [Delete] button.
- A dialogue box will open asking the Reason for deletion. Provide a brief explanation such as ‘Not Invoiced’, ‘Unmapped purchase’, or ‘Incorrect quantity’ and click [Delete] again.
- Delete purchases in bulk:
- This option is best suited for deleting purchases where inspection of values in each purchase is not necessary. In this case, the advanced filtering option is used to filter all the incorrect purchases.
- If required, open a few of the purchases in the list to ensure the criteria for deletion holds true.
- Once the incorrect purchases are filtered, click on the checkmark on the blue bar to select all the filtered purchases. The Purchases page displays only the latest 25 purchases matching the filter criteria. Note that clicking on the checkmark will select all purchases spanning across multiple pages.
- Now click on the bin icon next to the checkmark on the blue bar.
-
Enter the Reason for Deletion in the dialogue box and click [Delete] again.
Figure Purchases 8: Edit icons for multiple purchases.
When there are multiple pages of purchases listed, the checkmark in the blue bar will select purchases in ALL pages. Be mindful when using it to delete purchases.


