Connectors
Table of contents
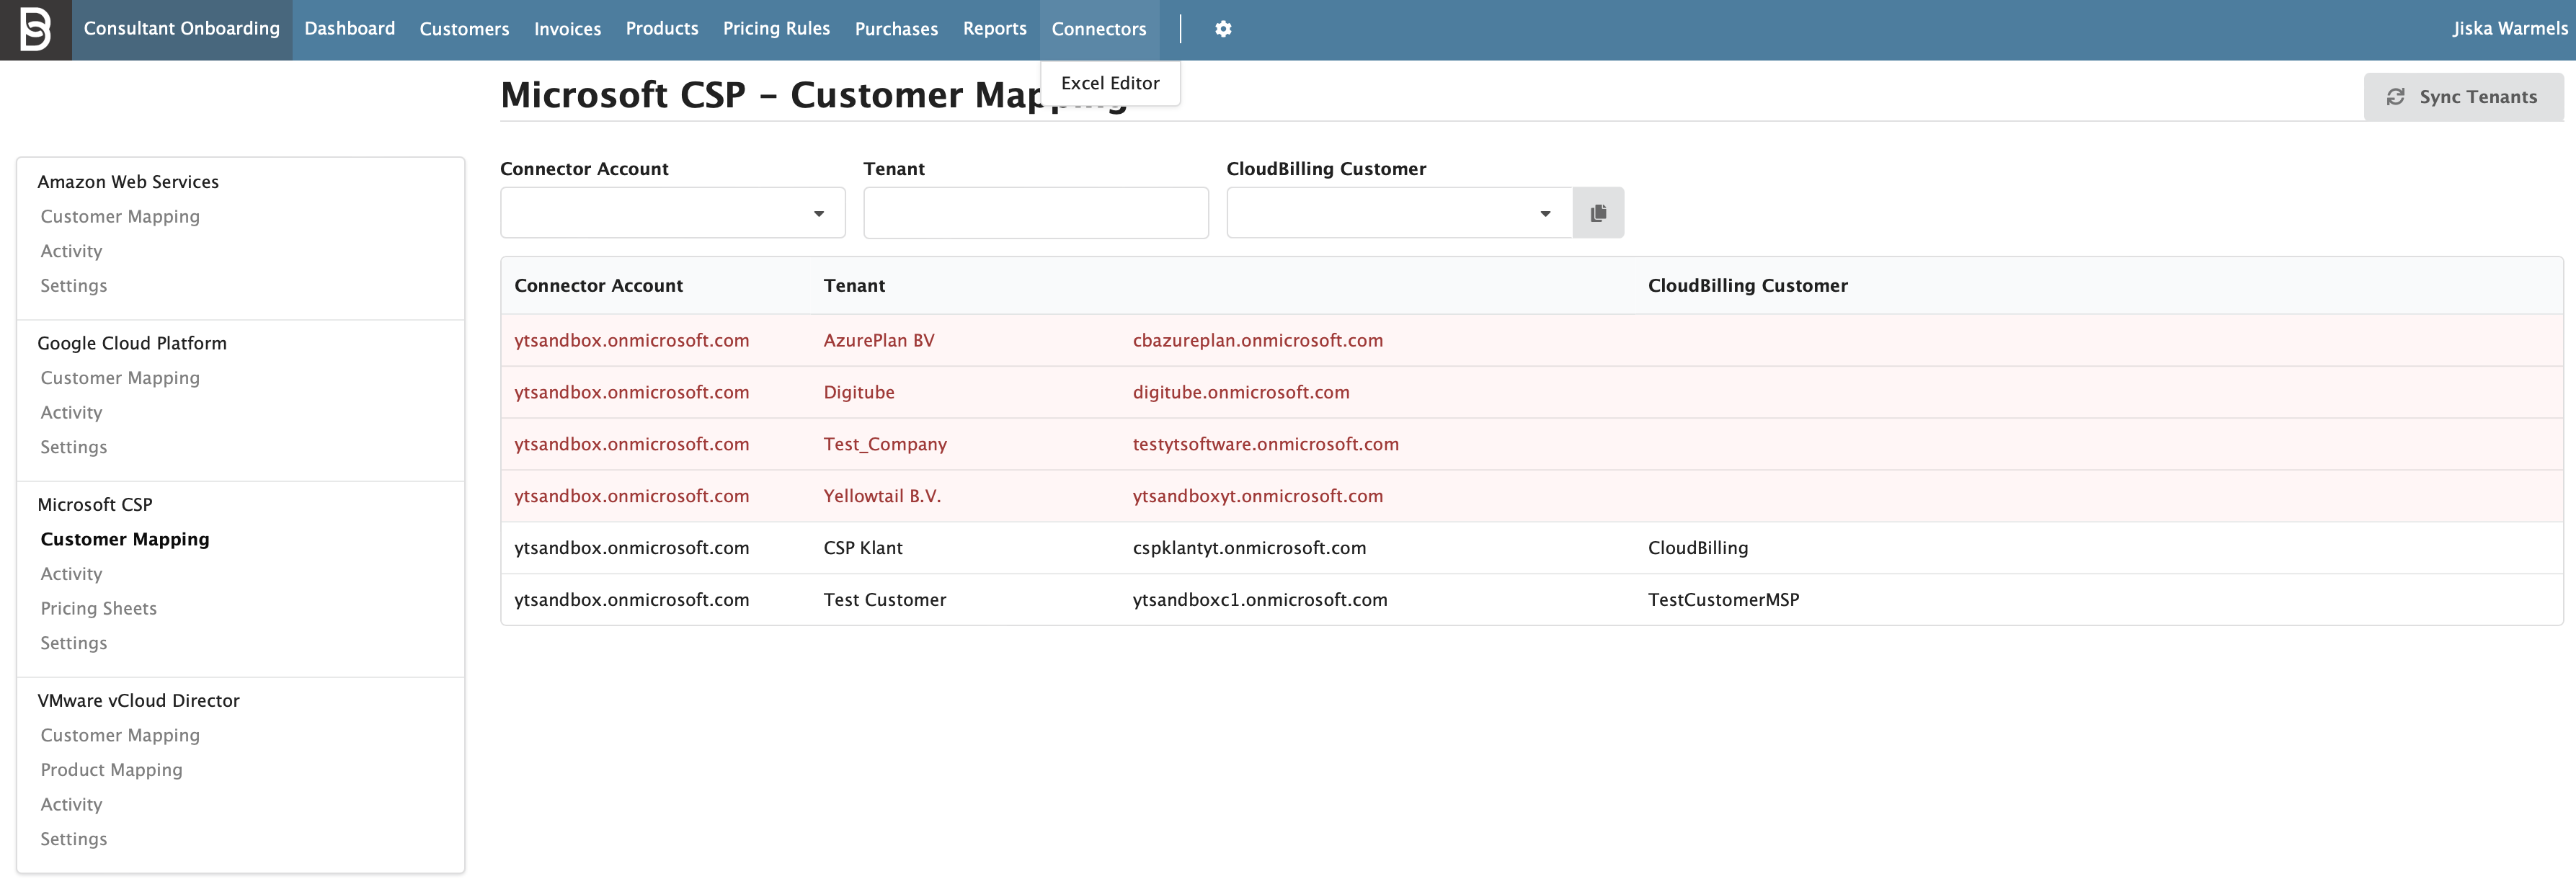
The connectors in an environment can be connected to multiple sources. There are four standard connectors for CSP, AWS, VMWare, and GCP. Custom connectors can be developed by CloudBilling customers. Additionally, APIs can be used to send information or requests to CloudBilling to either add new data or retrieve data. The settings of the connectors can be found under the section “Connectors” in the header, as can be seen in Figure Connectors 1. More technical information on how to configure and use the connectors can be found on the Connectors page. This Chapter will go into the general functions of the connectors and connector screens in the CloudBilling environment.
The connectors can be found under the “Connectors” in the menu bar. If the Excel Editor is also active in this environment, it can be found by hovering over the Connectors (Figure Connectors 1). On the connector screen it will show all the different connectors that are active in the environment in a box to the left side of the screen. The structure of the connectors is as following: name of the connector, customer mappings related to the connector, activity of the connector, and settings of the connector. The name of the connector is used as a header of each section. All connectors have at least the three pages Customer Mapping, Activity, and Settings linked. Clicking these links will bring you to the related page for corresponding connector. The VMWare vCloud Director connector additionally has a Product Mapping screen.
Figure Connectors 1: Connectors screen, Microsoft CSP Customer Mapping
Customer Mapping
When clicking on Connectors in the menu, the user will be automatically redirected to the Customer Mapping screen for their first connector, alphabetically ordered. The customer mapping screen for Microsoft CSP is shown in Figure Connectors 2. This screen looks similar for all the connectors and exists of two columns with a search bar above it. As the name might imply, this screen is used to map customer accounts that come in from the connector to customer accounts that exist in CloudBilling. These mappings are necessary for CloudBilling to understand what usage belongs to what customer.
The right column of the two columns on this screen shows the account names that are sent in by the connector. The left column shows what customer in CloudBilling this account is mapped to. When an account is mapped, the usage that comes in from that account is automatically connected to the CloudBilling customer. The usage will not come in for unmapped accounts as purchases but will still exist in the partner center of that connector. Therefore, it is always wise to map all connector accounts to a CloudBilling customer. Only then it can be ensured that no usage is missed.
When customers are unmapped in the connector mappings, there will be no usage generated for these customers. Always ensure that all customers are mapped in the customer mappings for each connector that is active in the environment.
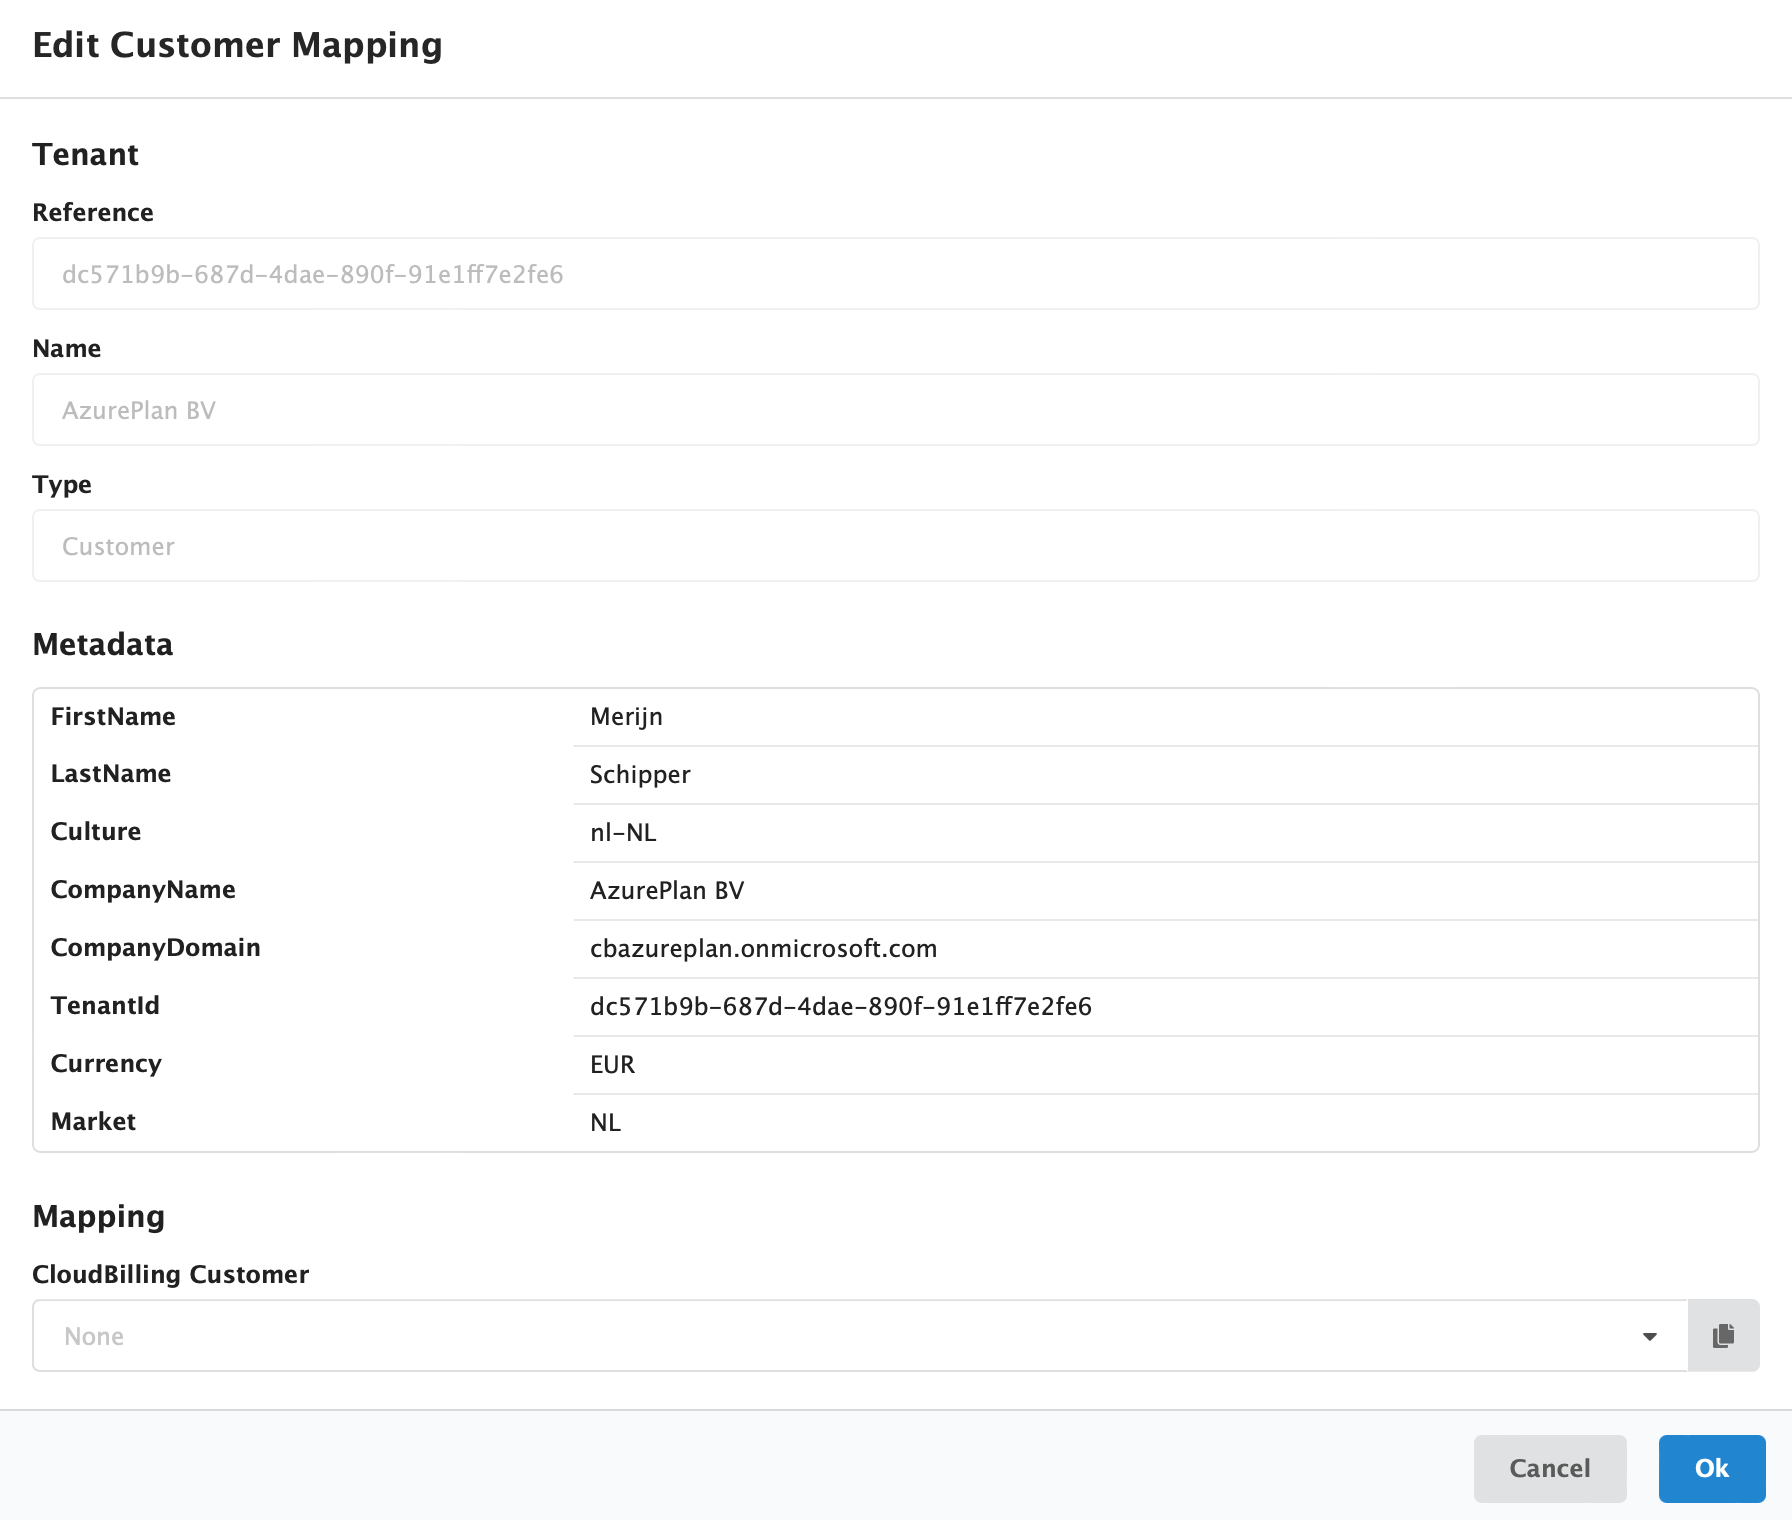
In this case, only the bottom customer is mapped to a CloudBilling account, to retrieve the purchases of the other accounts, a customer should be made in CloudBilling, and the account should be mapped to this customer in customer mappings screen. The pop-up allows for the customer mapping information to be viewed and the CloudBilling customer to be selected in the Mapping prompt Figure Connectors 2.
Figure Connectors 2: Connectors screen, Customer mapping dropdown
When a customer is selected in this list, the [Ok] button to the right bottom of the pop-up can be used to confirm the mapping. Afterwards, a customer can be unmapped or mapped to another CloudBilling customer in the same manner.
Above each column there is a search field included which allows the user to search within that column on the CloudBilling customer in the left column and on the Connector Tenant in the right column.
At the right top of the screen a [Sync Tenants] button can be found. This button can be used to refresh the customers that are shown in the list by running a synchronization with the related partner center. This can, for example, be useful when there was a new customer added in the partner center that has not yet shown up in the list.
The product mappings for the VMWare vCloud Connector work in a similar way as the Customer Mapping screen, only here product mappings can be added manually. This entails that the data in the right column is created by hand, based on metadata in the purchases. That information can then be mapped to an existing product in CloudBilling.
Activity
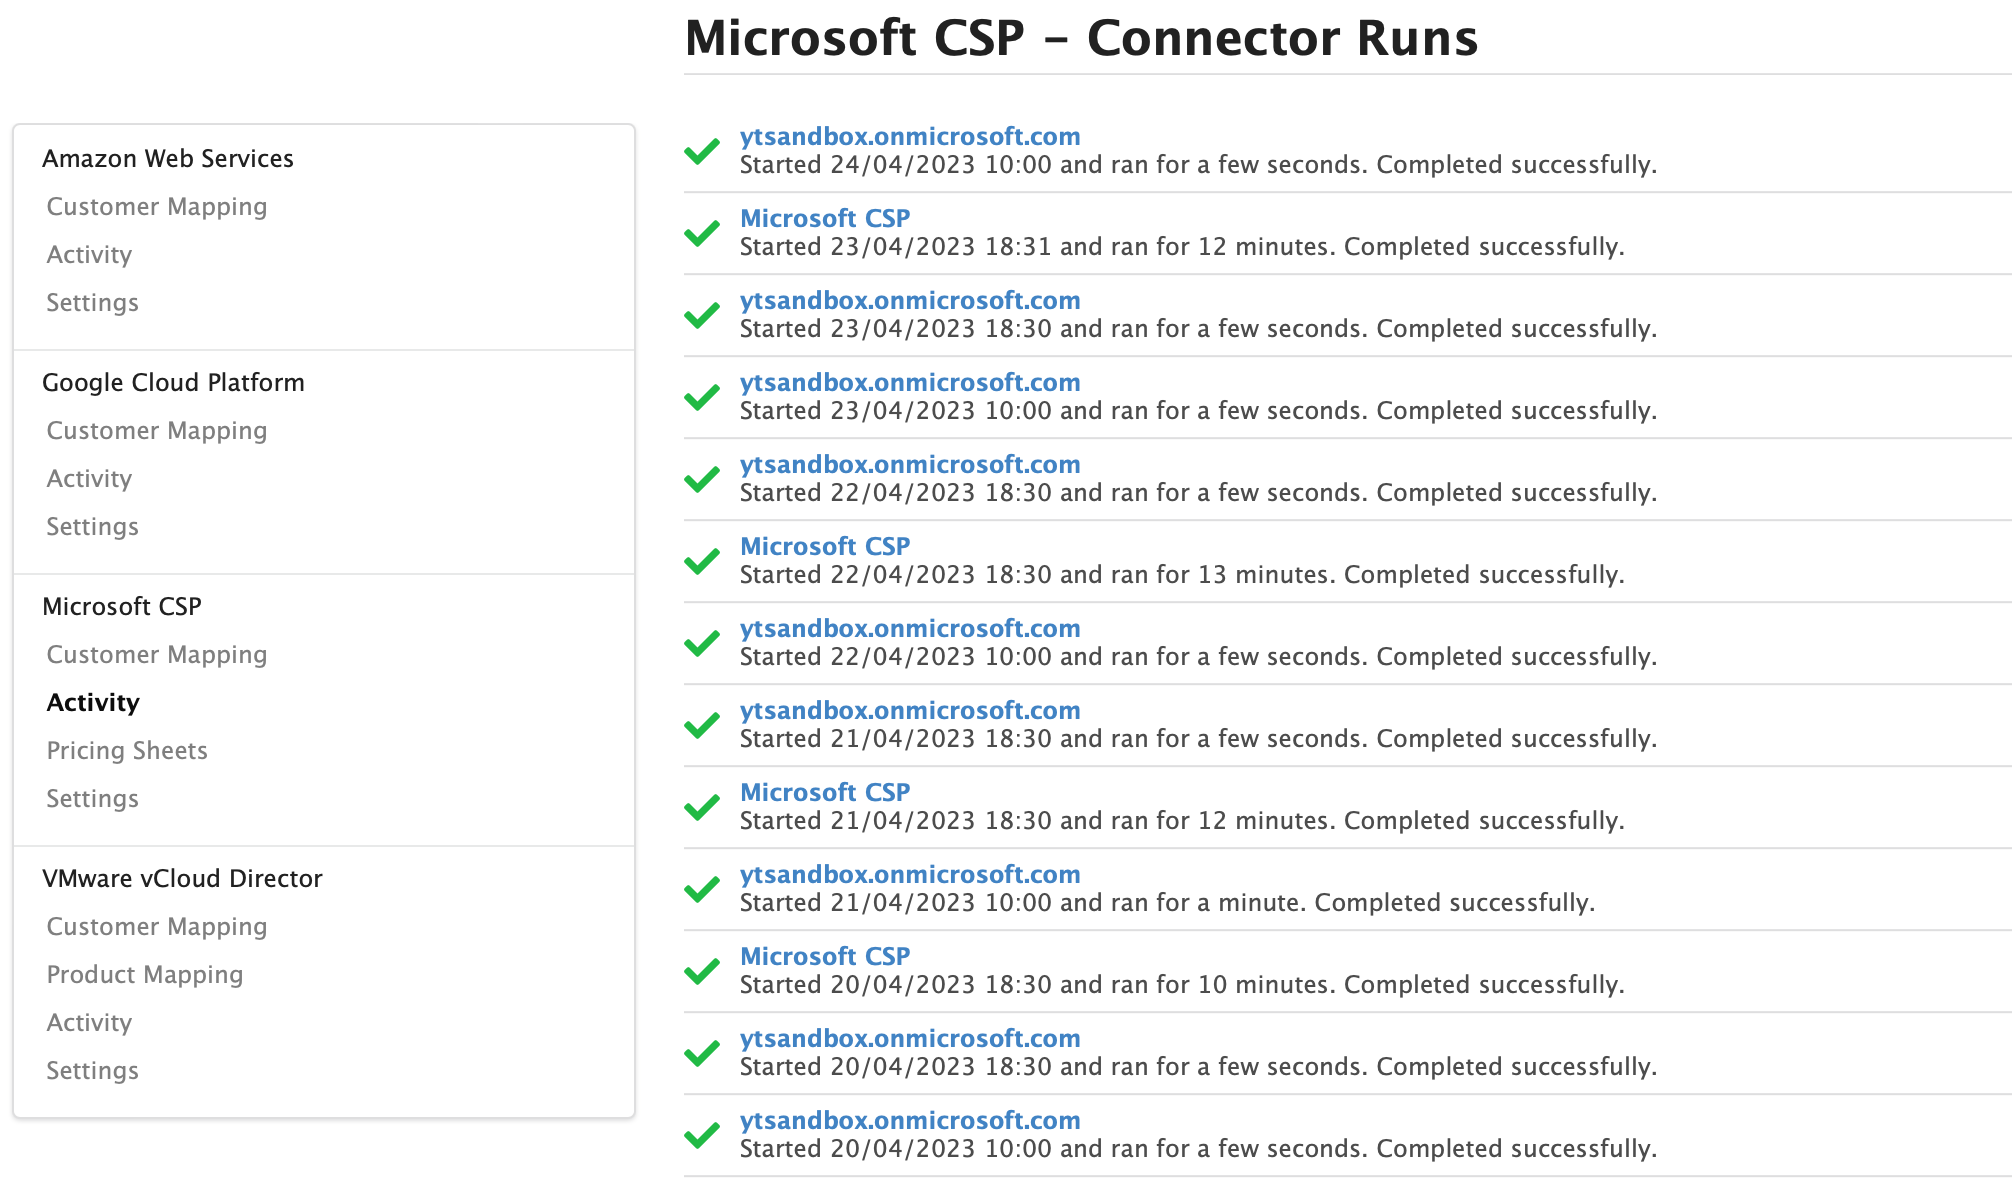
The activity screen shows the runs of the connectors, including a status, run day, runtime, and completion status ( Figure Connectors 3). Ideally, all the connector runs are checked with a green checkmark. This means that the connector run completed successfully without any errors. The list shows the connector its name, with some text below it regarding the run to give a quick overview. The additional information states when that particular connector run took place and states the length of the runtime. Then the state of the run is included. When the checkmark is green, the run should always state “Completed successfully”. This status can also be “Completed with errors” or “Did not complete successfully”.
Figure Connectors 3: Connectors screen, Connector runs (Activity)
If there is a warning, the green checkmark will change to an orange warning sign with an exclamation mark. If the run did not complete successfully in a problematic way, this warning sign will be red.
Each connector run is clickable by clicking on the blue name of the connector for a certain run. There are always two types of runs, which run on two different times of day. One run is the license run which will retrieve the purchases for the products. The other run is the maintenance run which will retrieve the products and pricing rules for a category. An example of a successful run can be viewed in Figure Connectors 4.
Figure Connectors 4: Connectors screen, Connector runs (Successful run)
For the Microsoft CSP connector in this environment, there are three connectors turned on, Azure, Azure Plan, and NCE Licenses. The table can be used to view the connector activity. When a connector has an orange or red warning, it will show as a coloured line in the table, as can be seen in Figure 62. It is recommended to contact support regarding any connector errors that are not recognized by the user. The errors shown below state that there is no account connected for the connector (orange warning) and that maintenance was running with a deleted user account (red error).
Figure Connectors 5: Connectors screen, Connector runs (Warning and Error)
Settings
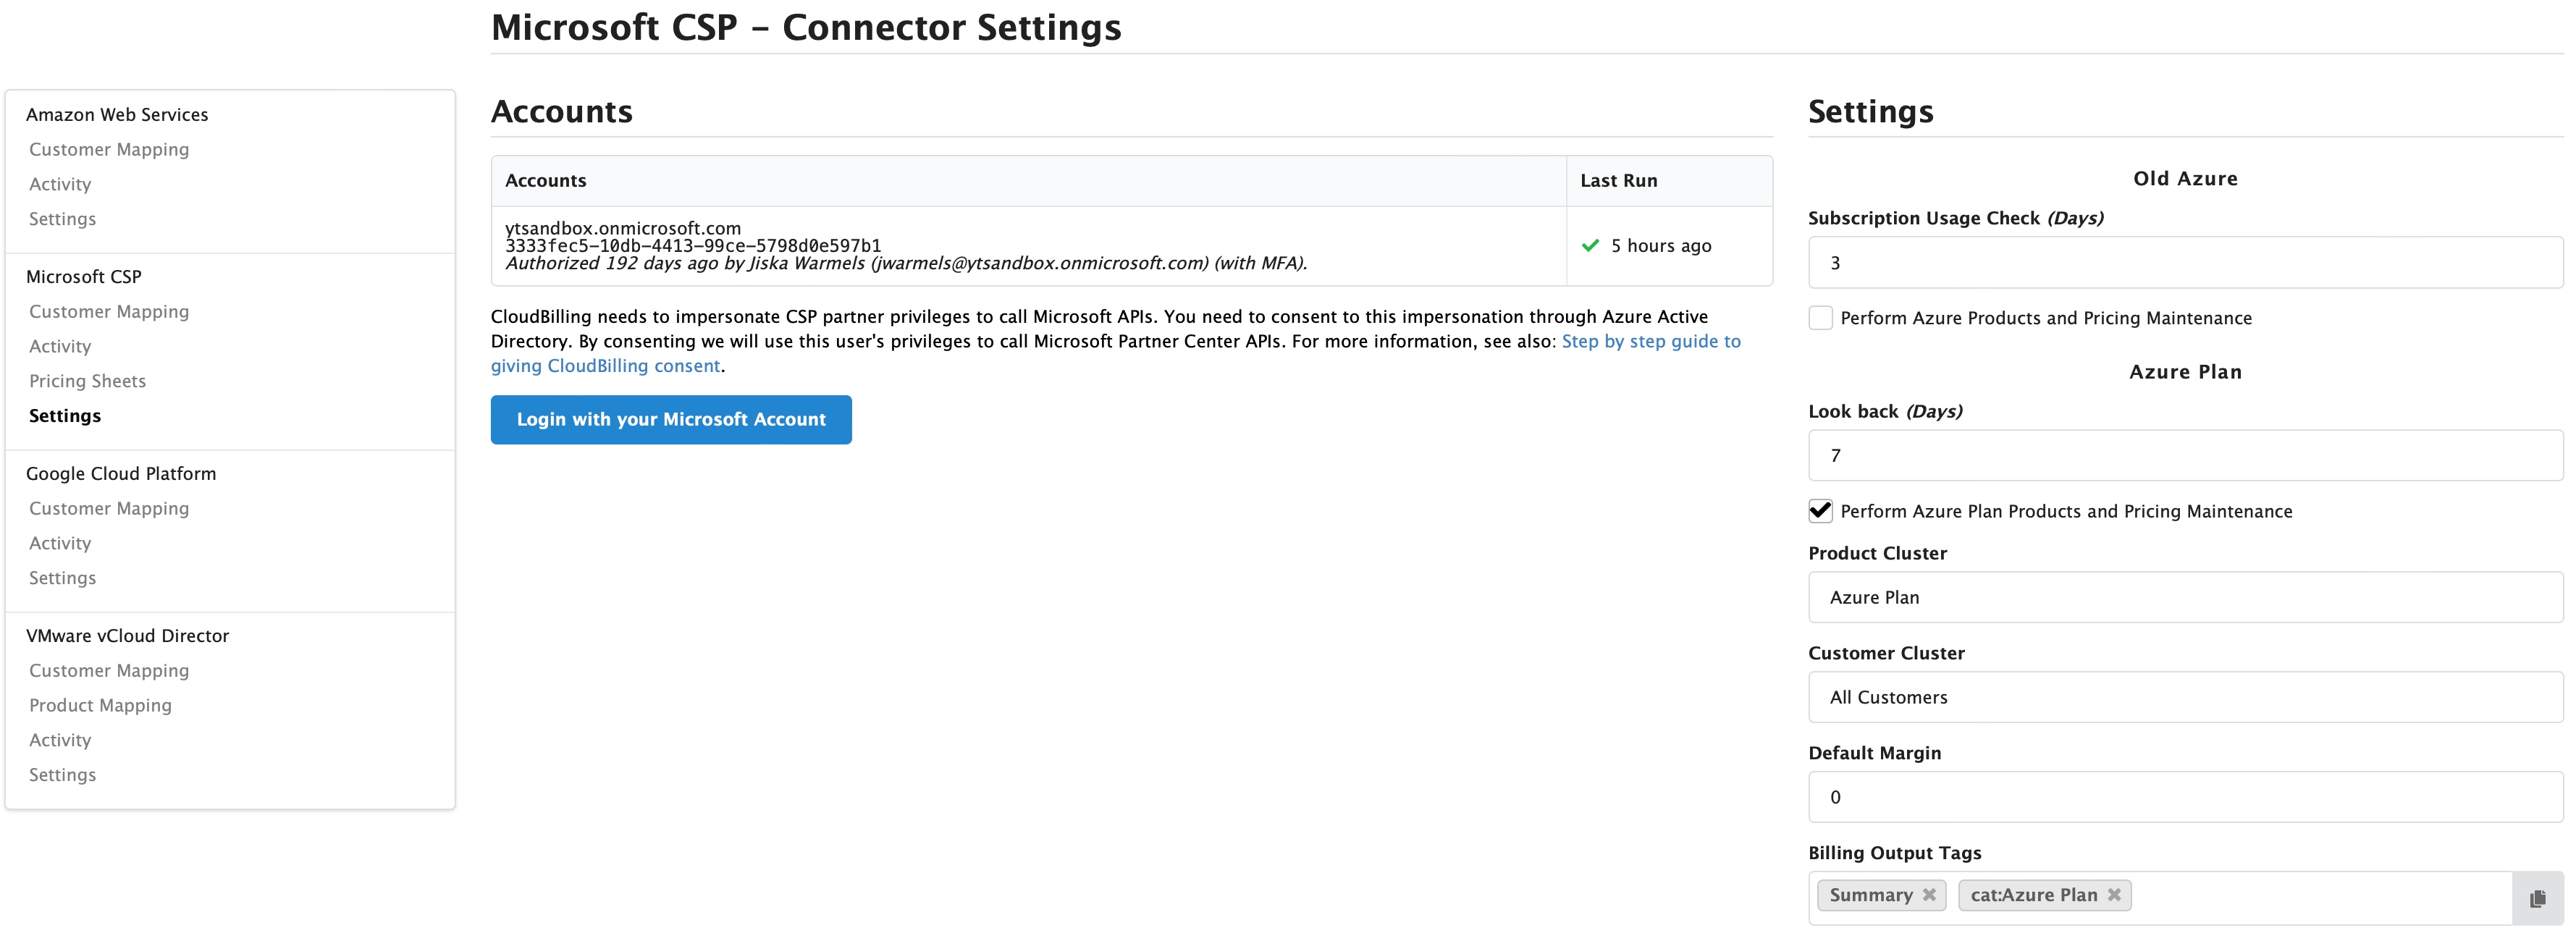
The Settings screen of a connector (Figure Connectors 6) will give the user an overview of the accounts and their status (middle), as well as the settings of the connectors (right). This section will discuss both the Accounts settings as well as the connector settings in more detail.
Figure Connectors 6: Connectors screen, Settings
The settings for each connector to the right of the screen have some standard settings that should be set up when the connector is first turned on. As an example, the settings for Azure Plan in Figure Connectors 6 will be explained in more detail.
- Look back (Days): the number of days that the connector retrieves information from. The default setting is always 7 but can be set back to a higher number to retrieve more previous days.
- When the setting perform products and pricing maintenance is turned on, the options below will show. This setting entails that the connector will update the products and pricing rules for the portfolio of Azure Plan automatically.
- Product Cluster: is used to make the products and pricing rules on, needs to exist.
- Customer Cluster: usually All Customers, will ensure that the pricing rules are set to that customer cluster.
- Default Margin: ensures that the pricing rules include a default margin for all the products of Azure Plan.
- Billing Output Tags: the BOTs that are used on the pricing rules. Might need to be added to the template if they are not standard.
The Billed One-time Generic setting becomes visible when the settings for Reserved Instances, Azure Marketplace, Software Subscriptions or Customer Credits are activated and only impacts those product categories. By default, CloudBilling always reads the current month’s UnbilledOneTimeInvoiceLineItems. Between the 1st and 7th of each month, CloudBilling will also read the previous month’s UnbilledOneTimeInvoiceLineItems. By checking the box, CloudBilling will read the prior month’s UnbilledOneTimeInvoiceLineItems, even after the 7th. Keep in mind that the UnbilledOneTimeInvoiceLineItems may no longer be available at that moment.
For the accounts, the account that is shown in the Accounts table is clickable. When there are multiple accounts connected, this will show as multiple rows. The blue “Login with your Microsoft Account” can be used to add an additional account. When adding a new account, the integration of Microsoft will ask the user to go through a series of steps to login to their account and give CloudBilling the correct permissions. When an account is edited, the screen in Figure Connectors 7 can be seen. An account needs at least a name, for the region, currency, and locale settings. The default settings will be used if left empty. The name should be descriptive of what the connector does. Region has a default of “NL”, Currency has a default of “EUR”, and Locale has a default of “nl-NL”. If these settings should be different than the default, they should be changed. The [Enabled] button allows to turn the account on and off.
Figure Connectors 7: Connectors Settings, edit account


